Introduction
In this article we will set up a Keycloak Oauth2 Single Sign-On (SSO)
server with two clients and two user accounts with differing
permissions. We will create a Spring Boot Java application (a \"resource
server\") with two REST endpoints, secured by the Keycloak server and
requiring different roles for access. We will send HTTP requests to the
Keycloak server to create a valid Oauth2 token for each user, and use it
to invoke the REST endpoints in the Spring Boot resource server.
Securing the communications between the parties with HTTPS is outside
the scope of this article.
You will need:
- A command line shell environment, such as Bash
- A Java development environment, such as OpenJDK11
- A text editor or Integrated Development Environment (IDE), for
authoring code. - A build tool such as Gradle or Maven.
- Tools for making HTTP requests, such as cURL, wget, or Postman.
- Tools for formatting JSON, such as jq (optional).
- Docker (optional)
Some programming experience with Java or related technologies would be
most beneficial.
Setting up a Keycloak Server
There are different ways to set up a Keycloak server as described on the
project website. In this
example we will use Docker, but for the purpose of this article it
doesn\’t really matter which way you do it. To create and start the
server using Docker, run (in a Bash shell):
$ docker run --name keycloak -d -p 8082:8080 -p 8445:8443 -e KEYCLOAK_USER=admin -e KEYCLOAK_PASSWORD=admin quay.io/keycloak/keycloak:11.0.0This will expose the Keycloak server to listen to HTTP on 8082 and HTTPS
on 8445. If you want to listen on other ports, just modify the command
above. I chose these ports to minimise the chance of clashing with any
other servers running on my machine. If you are not familiar with
setting up a realm on Keycloak, follow this
tutorial
on the Keycloak website to create a realm called myrealm, which is the
realm we will use for the remainder of this article.
Create a Keycloak Client for your Spring Boot Resource Server
We will create a Keycloak Client called salutations-client:
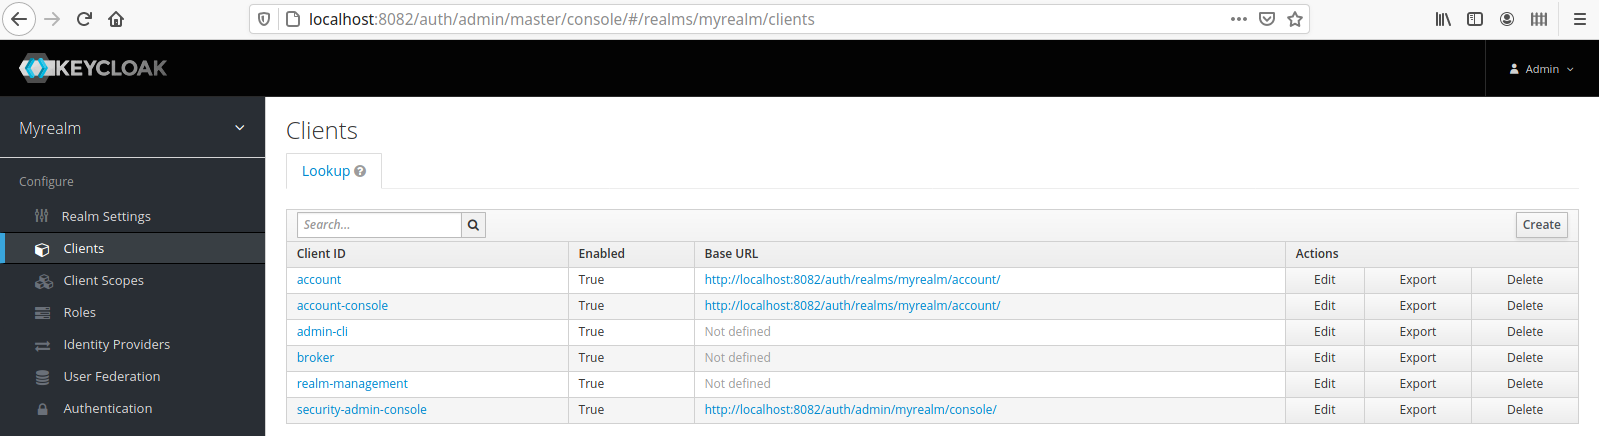
- Go to myrealm
- Click Clients
- Click Create in the top-right of the page, as shown below:
- Create a client called salutations-client as shown below:
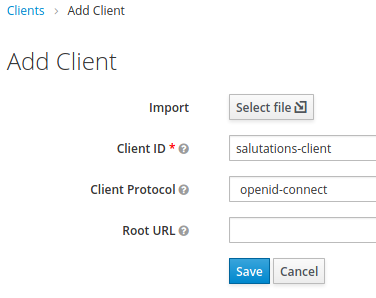
- Save it.
- Under Settings, set the Access Type to bearer-only, and the Admin
URL to https://localhost, as shown:
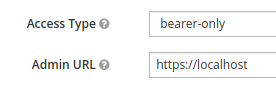
- Save it.
- Under Roles, select Add role. Give the new role a name, eg
special-user, and save it.

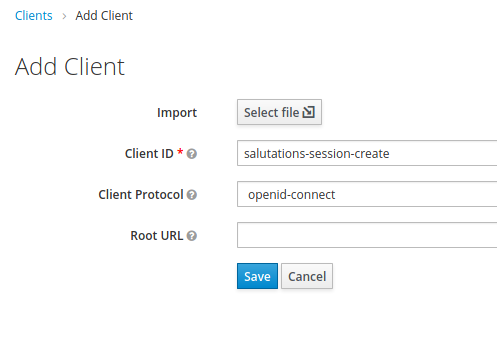
Create a Keycloak Client for User Authentication
We will create a Keycloak Client called salutations-client:
- Go to myrealm
- Click Clients
- Click Create in the top-right of the page.
- Create a client called salutations-session-create as shown below:
- Save it.
- Under Settings, set the Access Type to openid-connect, the Root URL
to http://localhost, the Valid Redirect URIs to http://localhost/*,
the Admin URL to http://localhost, the Web Origins to
http://localhost, as shown:
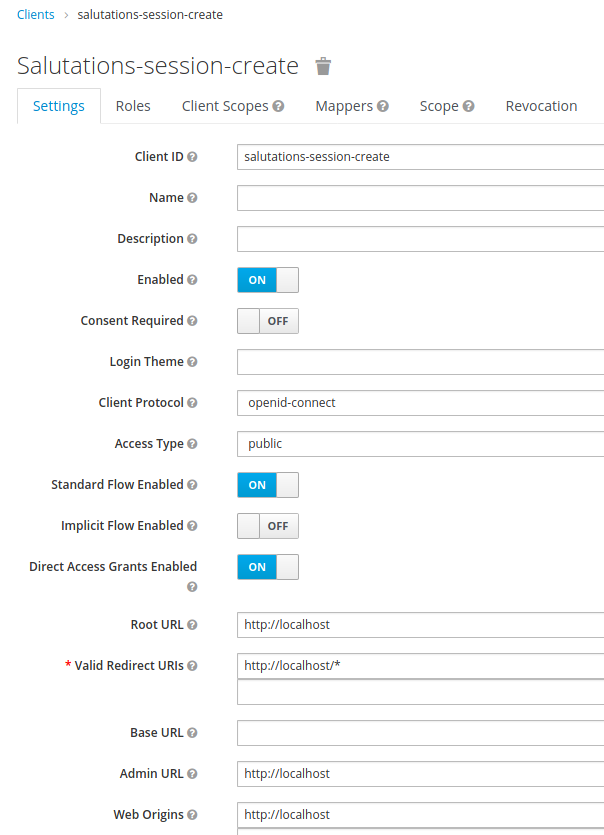
- Save it.
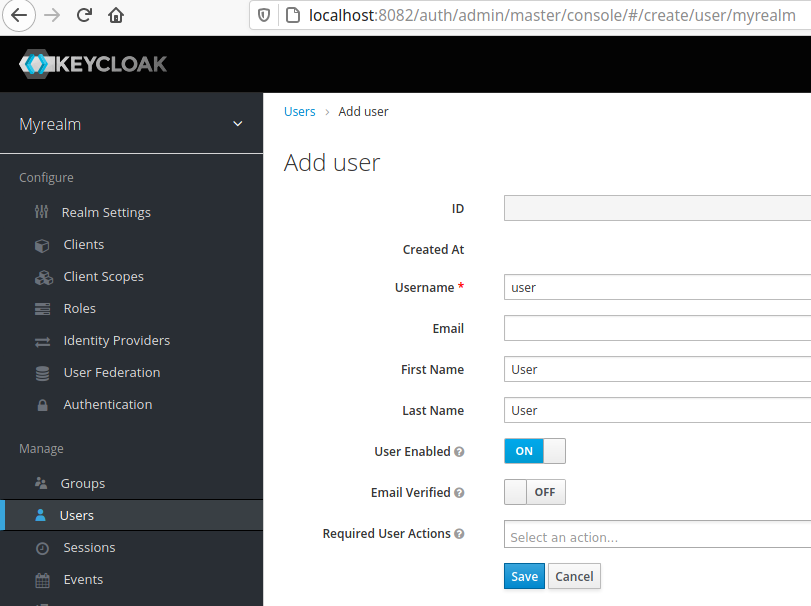
Add Users and Role Mappings
- Under Users, select Add user, and create a user with the username
user. Feel free to choose a more interesting name here.
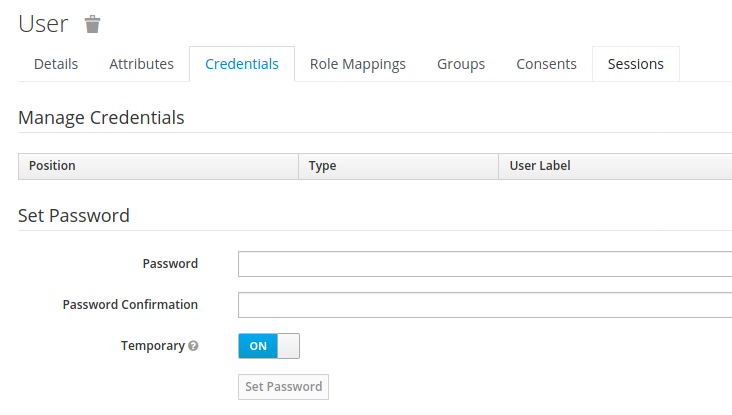
- Set a password for your user, and set Temporary to OFF. For this
demo, a password of password will suffice.
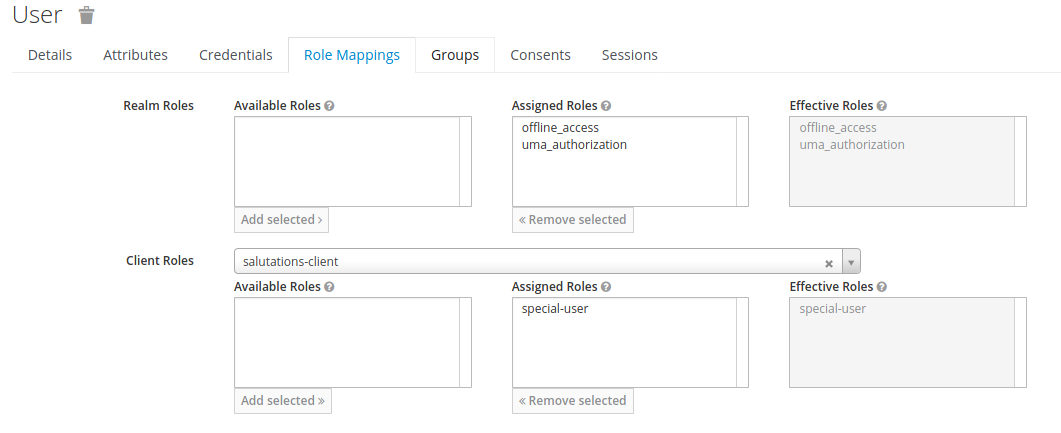
- Under Role Mappings, select from the Client Roles dropdown the
salutations-client client that you created in the steps above. Under
Available Roles, click on the special-user role that you created in
the steps above. Click Add selected, to shift the role into the
Assigned Roles box. Now the user user has the special-user role.
- Repeat steps 1. and 2. for a new user called user2, but do not
associate this user with any roles as for the user user.
Now you are ready to create a Spring Boot resource server that will
grant access to REST endpoints only if the user requesting them is
authenticated and has the correct role.
Spring Configuration
Go to Spring Initializr to create a new
Spring project. Add the following Spring dependencies before generating
and downloading the project:
- Oauth2 Resource Server
- Cloud Oauth2
- Spring Security
- Spring Web
- Spring Data JPA
Add the following dependencies to your classpath, which I have shown in
Gradle format:
// https://mvnrepository.com/artifact/com.nimbusds/nimbus-jose-jwt
compile     'com.nimbusds:nimbus-jose-jwt:9.0.1'
runtimeOnly 'com.h2database:h2'
Here is the application.properties file from the resources folder:
## Oauth2 Configuration (Keycloak Auth Server)
spring.security.oauth2.resourceserver.jwt.issuer-uri=https://localhost:8445/auth/realms/myrealm
spring.security.oauth2.resourceserver.jwt.jwk-set-uri=http://localhost:8082/auth/realms/myrealm/protocol/openid-connect/certs
spring.security.oauth2.resource.prefer-token-info=true
Spring Security
package com.cheerfulprogramming.edwhiting.keycloakdemo.config;

import org.springframework.boot.autoconfigure.security.oauth2.client.EnableOAuth2Sso;
import org.springframework.context.annotation.Configuration;
import org.springframework.core.convert.converter.Converter;
import org.springframework.http.HttpMethod;
import org.springframework.security.config.annotation.method.configuration.EnableGlobalMethodSecurity;
import org.springframework.security.config.annotation.web.builders.HttpSecurity;
import org.springframework.security.config.annotation.web.configuration.WebSecurityConfigurerAdapter;
import org.springframework.security.config.http.SessionCreationPolicy;
import org.springframework.security.core.GrantedAuthority;
import org.springframework.security.oauth2.jwt.Jwt;
import org.springframework.security.oauth2.server.resource.authentication.JwtAuthenticationConverter;

import java.util.Collection;

@Configuration
@EnableOAuth2Sso
@EnableGlobalMethodSecurity(prePostEnabled = true, securedEnabled = true)
public class WebSecurity extends WebSecurityConfigurerAdapter {
    @Override
    public void configure(HttpSecurity http) throws Exception {
        http
                .httpBasic().disable()
                .formLogin().disable()
                .logout().disable()
                .cors().disable()
                .csrf().disable()
                .oauth2ResourceServer(oauth2ResourceServer ->
                        oauth2ResourceServer.jwt(jwt ->
                                jwt.jwtAuthenticationConverter(jwtAuthenticationConverter())))
                .sessionManagement(sessionManagement ->
                        sessionManagement.sessionCreationPolicy(SessionCreationPolicy.STATELESS))
                .authorizeRequests()
                    .antMatchers(HttpMethod.GET, "/api/salutations/**").permitAll()
                    .anyRequest().authenticated();
    }

    private JwtAuthenticationConverter jwtAuthenticationConverter() {
        JwtAuthenticationConverter j = new JwtAuthenticationConverter();
        j.setJwtGrantedAuthoritiesConverter(jwtGrantedAuthoritiesConverter());
        return j;
    }

    private Converter<Jwt, Collection<GrantedAuthority>> jwtGrantedAuthoritiesConverter() {
        CustomKeycloakGrantedAuthoritiesConverter c = new CustomKeycloakGrantedAuthoritiesConverter("salutations-client");
        c.setAuthorityPrefix("ROLE_");
        return c;
    }
}
Here is the CustomKeycloakGrantedAuthoritiesConverter:
package com.cheerfulprogramming.edwhiting.keycloakdemo.config;

import com.nimbusds.jose.shaded.json.JSONArray;
import com.nimbusds.jose.shaded.json.JSONObject;
import org.springframework.core.convert.converter.Converter;
import org.springframework.security.core.GrantedAuthority;
import org.springframework.security.core.authority.SimpleGrantedAuthority;
import org.springframework.security.oauth2.jwt.Jwt;

import java.util.ArrayList;
import java.util.Collection;
import java.util.Optional;
import java.util.stream.Collectors;

public class CustomKeycloakGrantedAuthoritiesConverter implements Converter<Jwt, Collection<GrantedAuthority>> {

    public static final String RESOURCE_ACCESS = "resource_access";
    public static final String ROLES = "roles";

    private final String clientId;
    private String authorityPrefix = "ROLE_";

    public CustomKeycloakGrantedAuthoritiesConverter(final String clientId) {
        this.clientId = clientId;
    }

    /**
      * This method extracts the elements of the "roles" array for the specified clientId, from the
      * JWT token supplied by Keycloak when a user authenticates.  eg  where clientId is "my-client-id",
      * and the resource request contains the token below, the roles will be ["user", "admin"].
      * {
      *  ...,
      *  "resource_access": {
      *   "my-client-id": {
      *    "roles": [
      *     "user",
      *     "admin"
      *    ]
      *   },
      *   ...
      *  },
      *  ...
      * }
      * @param source
      * @return
      */
    @Override
    public Collection<GrantedAuthority> convert(final Jwt source) {
        return Optional.ofNullable(source.getClaim(RESOURCE_ACCESS)).stream()
                .map(JSONObject.class::cast)
                .flatMap(resourceAccessClaim -> Optional.ofNullable(resourceAccessClaim.get(clientId)).stream())
                .map(JSONObject.class::cast)
                .flatMap(clientClaim -> Optional.ofNullable(clientClaim.get(ROLES)).stream())
                .map(JSONArray.class::cast)
                .flatMap(roles -> roles.stream())
                .map(role-> new SimpleGrantedAuthority(this.authorityPrefix + role))
                .collect(Collectors.toCollection(ArrayList::new));
    }

    public CustomKeycloakGrantedAuthoritiesConverter setAuthorityPrefix(final String authorityPrefix) {
        this.authorityPrefix = authorityPrefix;
        return this;
    }
}
Here is an example controller with the special-user role enforced on one
of the endpoints.
package com.cheerfulprogramming.edwhiting.keycloakdemo.controller.salutations;

import org.springframework.security.access.prepost.PreAuthorize;
import org.springframework.security.core.annotation.AuthenticationPrincipal;
import org.springframework.security.oauth2.server.resource.authentication.JwtAuthenticationToken;
import org.springframework.web.bind.annotation.*;

import java.security.Principal;

@RestController("salutationsRestController")
@RequestMapping("/api/salutations")
public class Controller {

    /**
      * This method is open to any authenticated user.
      */
    @GetMapping("/greeting")
    public String greeting(@AuthenticationPrincipal JwtAuthenticationToken token) {
        /* You can inject the token as shown above and work with it if you wish */
        return "Hello Dave";
    }

    /**
      * This method is protected by Spring security so that only authenticated users
      * with the "special-user" role can execute it.
      */
    @PreAuthorize("hasRole('special-user')")
    @GetMapping("/user")
    public Principal user(Principal user) {
        return user;
    }
}
Test Your New Application
This section will demonstrate how to authenticate against the Keycloak
server and call the Spring application with an HTTP request. In the real
world, this is something that a browser-based JavaScript application
would do. There is a Keycloak JavaScript client
library
available for front-end applications, and a wrapper has been produced
for Angular. For this
section, however, we will not build a front-end, but we will invoke the
endpoints directly. You will need a tool that can send hand-crafted HTTP
messages, such as cURL,
wget or
Postman. You will also benefit from a JSON
formatter such as jq. If you are
running a GNU/Linux computing environment, your package manager (eg yum,
apt, pacman) should have the ability to install at least some of these.
For this example I use cURL and jq, in a Bash environment.
The following code uses cURL to authenticate a user against the
salutations-session-create Keycloak server and create a session token,
which I have put in a Bash script called keycloak-session-create.sh for
convenience:
#!/bin/bash

function frontendToken() {
curl --request POST https://localhost:8445/auth/realms/myrealm/protocol/openid-connect/token \
    --header 'Content-Type: application/x-www-form-urlencoded' \
    --data-urlencode 'username=user' \
    --data-urlencode 'password=password' \
    --data-urlencode 'client_id=salutations-session-create' \
    --data-urlencode 'grant_type=password' \
    --insecure --silent --location
}

frontendToken
Be sure to make your script executable:
$ chmod 755 keycloak-session-create.shThe best way to invoke this script and be able to read the results
easily is to pipe the results through jq, as shown:
$ ./keycloak-session-create.sh | jqNow the useful datum that you need to include in any request to a
secured end-point is stored in the access_token field. To be able to use
it in your next request easily, store it in a variable called TOKEN, as
shown (I have used tr to remove the quotes):
$ TOKEN=$(./keycloak-session-create.sh | jq .access_token | tr -d '"')Now is the time to run your Spring Boot application that you created
earlier. Assuming that it is listening on port 8080, once you have
authenticated as shown above, you can make a request to a secured end
point as shown below. Note that if your session has expired, then
enabling –verbose will show the HTTP 401 error message.
$ curl --verbose \
    --header "Authorization: Bearer $TOKEN" \
    --header "Content-Type: application/json" \
    http://localhost:8080/api/salutations/greeting
Now test that your user has the role special-user and can access the
restricted API endpoint in your application:
$ curl --verbose \
    --header "Authorization: Bearer $TOKEN" \
    --header "Content-Type: application/json" \
    http://localhost:8080/api/salutations/user \
    | jq
Your application will reply with a large amount of information in JSON
format about your user account. To test the other, non-special user
user2, modify the keycloak-session-create.sh script to authenticate that
user, create a session token for that user instead, and repeat the HTTP
requests above for that user. You should get an HTTP 403 error for the
request to http://localhost:8080/api/salutations/user, with the message
being \"The request requires higher privileges than provided by the
access token.\", demonstrating that your priviliges restrictions are
working properly.
Further Reading
Spring Boot and Oauth2:
https://spring.io/guides/tutorials/spring-boot-oauth2/
Spring Security and Angular:
https://spring.io/guides/tutorials/spring-security-and-angular-js/
Baeldung – Simple SSO with Spring Security Oauth2:
https://www.baeldung.com/sso-spring-security-oauth2
Baeldung – Spring Oauth2 Angular (Legacy Stack):
https://www.baeldung.com/rest-api-spring-oauth2-angular-legacy
Keycloak Server: https://www.keycloak.org
Oauth2: https://oauth.net/2/
Spring Framework: https://spring.io/
Java: https://docs.oracle.com/en/java/javase/11/docs/api/index.html
Acknowledgements
The author acknowledges the traditional custodians of the Daruk and the
Eora People and pays respect to the Elders past and present.
Keycloak® is a registered trademark of Red Hat and/or its affiliates.
Oauth is a project of the Internet Engineering Task Force (IETF).
Postman® is a registered trademark of Postman, Inc.
Docker® and the Docker logo are trademarks or registered trademarks of
Docker, Inc. in the United States and/or other countries. Docker, Inc.
and other parties may also have trademark rights in other terms used
herein.
Spring® and Spring Boot® are registered trademarks of VMware and/or its
affiliates.
Linux® is the registered trademark of Linus Torvalds in the United
States and other countries.
Oracle® and Java® are registered trademarks of Oracle and/or its
affiliates.
Angular® is a registered trademark of Alphabet and/or its affiliates.
Gradle® is a registered trademark of Gradle, Inc.
Maven® is a registered trademark of the Apache Foundation.
Other names may be trademarks of their respective owners.